0x01 前言
前些天配置了ELK5(安装配置Elastic Stack 5)处理nginx日志(使用Elastic Stack处理nginx日志)。我发现日志中有好多攻击请求,因此我决定将nginx的waf变更为naxsi。
我之前使用ngx_lua_waf(loveshell/ngx_lua_waf)作为waf,在这里我不对这个waf应用进行说明,感兴趣的朋友可以通过链接到GitHub了解。
0x02 准备
首先naxsi是一款专为nginx打造的抗跨站攻击、防数据库注入的开源软件,GitHub地址如下:
需要格外注意的是:naxsi目前还不支持HTTPv2,详细原因请点击:issue #227。因此我已经将我网站的HTTPv2移除。
首先下载nginx(nginx org),我在写这篇文章的时候最新版的nginx版本为:nginx-1.11.6。首先下载nginx源代码到本地并解压:
#下载源码
[root@centos-t1 codex]# wget http://nginx.org/download/nginx-1.11.6.tar.gz

#解压
[root@centos-t1 codex]# tar zxvf nginx-1.11.6.tar.gz
然后下载naxsi的源码:
[root@centos-t1 codex]# git clone https://github.com/nbs-system/naxsi.git
0x03 编译
如果你已经编译好nginx而不想升级版本,那么你可以通过以下命令添加naxsi模块:
#进入nginx源码文件夹
[root@centos-t1 nginx-1.11.6]# cd /root/codex/nginx-1.11.6/

#configure
[root@centos-t1 nginx-1.11.6]# ./configure --add-module=/root/codex/naxsi/naxsi_src/

#编译
[root@centos-t1 nginx-1.11.6]# make

#安装
[root@centos-t1 nginx-1.11.6]# make install
如果你想重新编译nginx,那么可以在./configure –add-module=/root/codex/naxsi/naxsi_src/ 前后添加你需要添加的模块,例如:
./configure --prefix=/usr/local/nginx --sbin-path=/usr/sbin/nginx --conf-path=/usr/local/nginx/nginx.conf --pid-path=/var/run/nginx.pid --error-log-path=/var/log/nginx/error.log --http-log-path=/var/log/nginx/access.log --lock-path=/var/lock/nginx.lock --with-http_gunzip_module --with-pcre --with-pcre-jit --with-http_perl_module --with-ld-opt="-Wl,-E" --with-http_realip_module --with-http_secure_link_module --with-http_slice_module --with-http_ssl_module --with-http_stub_status_module --with-http_sub_module --with-http_v2_module --with-http_addition_module --with-http_xslt_module --with-http_image_filter_module --with-http_geoip_module --with-http_dav_module --with-http_flv_module --with-http_mp4_module --with-http_gzip_static_module --with-http_auth_request_module --with-http_random_index_module --with-select_module --with-poll_module --with-file-aio --with-http_degradation_module --with-md5-asm --with-sha1-asm --with-libatomic --http-client-body-temp-path=/var/tmp/nginx/client_body --http-proxy-temp-path=/var/tmp/nginx/proxy --http-fastcgi-temp-path=/var/tmp/nginx/fastcgi --http-uwsgi-temp-path=/var/tmp/nginx/uwsgi --http-scgi-temp-path=/var/tmp/nginx/scgi ./configure --add-module=/root/codex/naxsi/naxsi_src/
0x04 配置
首先复制核心规则到nginx目录:
[root@centos-t1 ~]# cp /root/codex/naxsi/naxsi_config/naxsi_core.rules /usr/local/nginx/
编译安装完成后还需要手动添加一些参数。首先需要将核心规则include到nginx.conf文件中:
#修改nginx.conf文件
[root@hk1 ~]# vim /usr/local/nginx/nginx.conf

#在http块中插入以下内容
include /usr/local/nginx/naxsi_core.rules;
然后修改每个站点的conf文件,并在location块中添加以下内容:
#LearningMode;
SecRulesEnabled;
DeniedUrl "/RequestDenied";
CheckRule "$SQL >= 8" BLOCK;
CheckRule "$RFI >= 8" BLOCK;
CheckRule "$TRAVERSAL >= 4" BLOCK;
CheckRule "$EVADE >= 4" BLOCK;
CheckRule "$XSS >= 8" BLOCK;
要注意的是,上面的内容仅对添加的location有效,如果你想对多个location有效,那么需要逐一添加。
完成后重新启动nginx即可。
如果你和我一样运行着Wordpress,那么请添加一下白名单到你的location中:
#进入到nginx文件夹
[root@centos-t1 ~]# cd /usr/local/nginx/

#clone 白名单
[root@centos-t1 nginx]# git clone https://github.com/nbs-system/naxsi-rules.git
将wordpress.rules或wordpress-minimal文件include到location中即可。
0x05 结语
wordpress.rules和wordpress-minimal这两个白名单并不是很完美,这两天我一直在手动添加白名单,Wordpress有许多参数都触发了核心规则。
配置完成后记得测试一下:
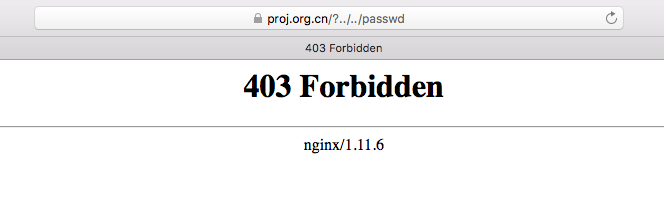
以下是日志:
2016/12/01 00:48:21 [error] 13196#0: *22665 NAXSI_FMT: ip=119.137.54.65&server=proj.org.cn&uri=/&learning=0&vers=0.55&total_processed=12&total_blocked=1&block=1&cscore0=$TRAVERSAL&score0=8&zone0=ARGS&id0=1200&var_name0=, client: 119.137.54.65, server: proj.org.cn, request: "GET /?../../passwd HTTP/1.1", host: "proj.org.cn"


 – pachosting")


